
STOP: IF YOU HAVE BEEN USING ANOTHER INTEGRATED EHR, DO NOT COMPLETE THE INTEGRATION WITHOUT TALKING TO A SUPPORT REP AT CASH PRACTICE FIRST. CALL (877) 343-8950 x102 or EMAIL SUPPORT@CASHPRACTICE.COM
You must first add account users for all of your staff:
It is highly recommended that you create separate and unique usernames and passwords for your account users and not just give them your admin username to use. The purpose is to maintain security and prevent those account users from accessing areas of CashPractice.com you do not want them to have access to. Their Clerk Key will identify their activity for tracking usage. In addition, you can control what the account user can do and when they can log in. Click HERE for instructions on how to add Account Users to Cash Practice®.
Before processing payments within ChiroHD using the Auto-Debit System®, you must first complete this one-time setup.
PLEASE NOTE: ChiroHD requires a Google Chrome browser.
Getting Started
In Cash Practice:
Step 1: You must be able to log in to the Admin account OR as an Account User who has been given permission to access the Auto-Debit System Setup.
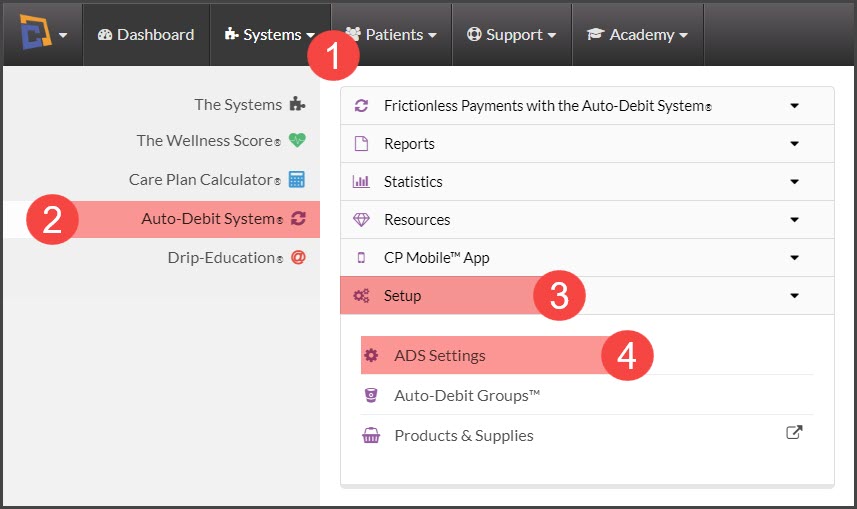
Hover the mouse over [Systems]
Click on [Auto-Debit System]
Next, click [Setup]
From here, select [ADS Settings]
Step 2: Click on [Step 6: Software] & select the [View TPS Keys] button at the top of the page.

Step 3: In this window, you will find the required integration keys. Keep this screen open as you will need to copy and paste the keys from Cash Practice into ChiroHD. (Note: The keys listed below are only examples)

In ChiroHD:
Step 1: From the top of your ChiroHD screen:
First select [Settings]
Then click on [Initial Setup]
Click [Integrations] to open the Manage Integrations menu.

Step 2: Manage Integrations
From the drop-down menu, select [Cash Practice] as the merchant services provider.
Copy the Integration keys from Cash Practice and paste them into the corresponding fields of the ChiroHD Merchant Services screen & select a [Payment Sync Start Date].
Click [Save API Connection].

Make sure you complete ALL of the fields as pictured, or else the integration will not work properly.
Note: If you bring on a new team member in the future, you will need to create a user account for them in Cash Practice and enter their Clerk Key into ChiroHD in order for them to process payments.
In Cash Practice:
Step 1: Close out of the Third Party Software Integration Keys by clicking the [x] in the top right corner.

Step 2: Edit your Third-Party Software Settings
Select ChiroHD from the drop-down menu
Select again the date you'd like the payments to start syncing from Cash Practice to ChiroHD
Click [Save Step/Next]

Once you're done, you're ready to process payments. Woo-hoo!