

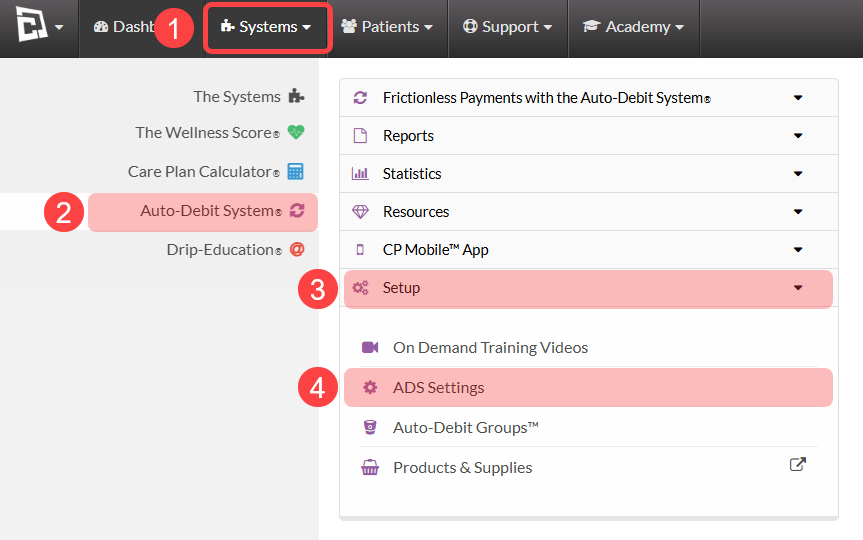
To access your Auto-Debit System Settings, follow the sequence below.
1. Click on the [Systems] menu
Select [Auto-Debit System®]
3. Choose [Setup]
4. Click [ADS Settings]
Step 1: System Mode
Select your system mode before running transactions:
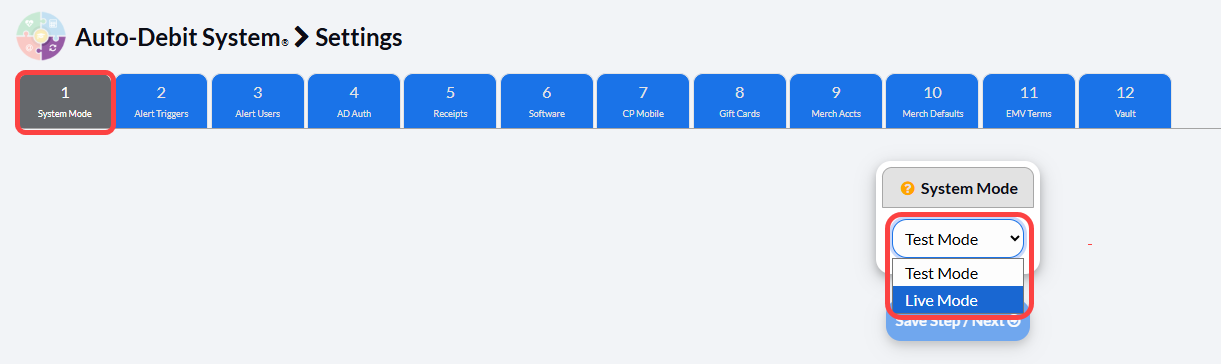
Test Mode | Use this mode to practice or test transactions. Important: Real auto-debits will not process while in Test Mode, please be sure to switch the system back to Live mode if practicing in test mode after live auto-debits are scheduled. |
Live Mode | Switch to this mode to process REAL transactions. Requires active merchant account details. |
Once finished, select the [Save Step/Next] button.
Step 2: Alert Triggers
Related: What are the Auto-Debits System (ADS) email notifications that I can send to my patient/patient?
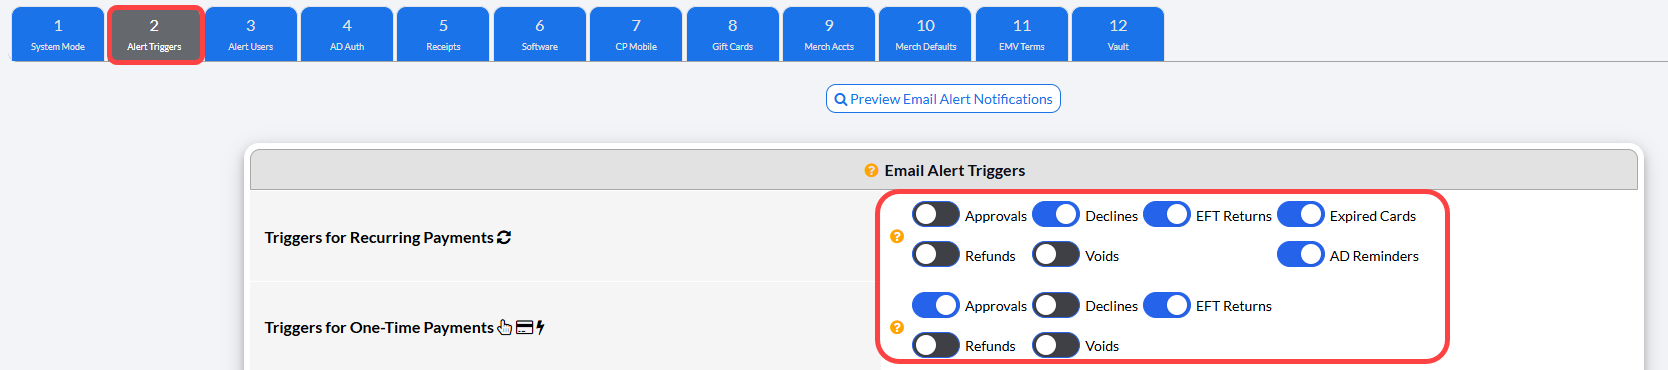
Automated email alerts can be sent to your patients for Approvals, Declines, EFT Returns (bounced), Refunds/Credits, and Voids. You can indicate which events you want an alert triggered with.
Email Alert Triggers:
Select which types of events you want to trigger email notifications to the patient. (The image above displays the settings that we recommend.)
Triggers for Recurring Payments | Toggle on/off which email alerts you would like sent to your patients for their scheduled auto-debits. |
Triggers for One-Time Payments | Toggle on/off which email alerts you want automatically sent to your patients for their one-time payments processed with the Virtual Terminal, EZ Swiper, or Simple Swiper. |
Add Button for Patient To Open CP Online Form (optional, but recommended)

Select the CP Online Forms® to be triggered for Expired Billing, Declined Payments, and scheduled reminders. We recommend using all three as pictured below.
With Expired Cards | Select the CP Online Form to be included in the email alert for members with expired cards. |
With Declined Payments | Select the CP Online For to be include in the email alert when a patient's payment is declined. |
With AD Reminders | Select the CP Online form to be included in the email alert when when an Auto-Debit reminder is due. |
Email Settings:
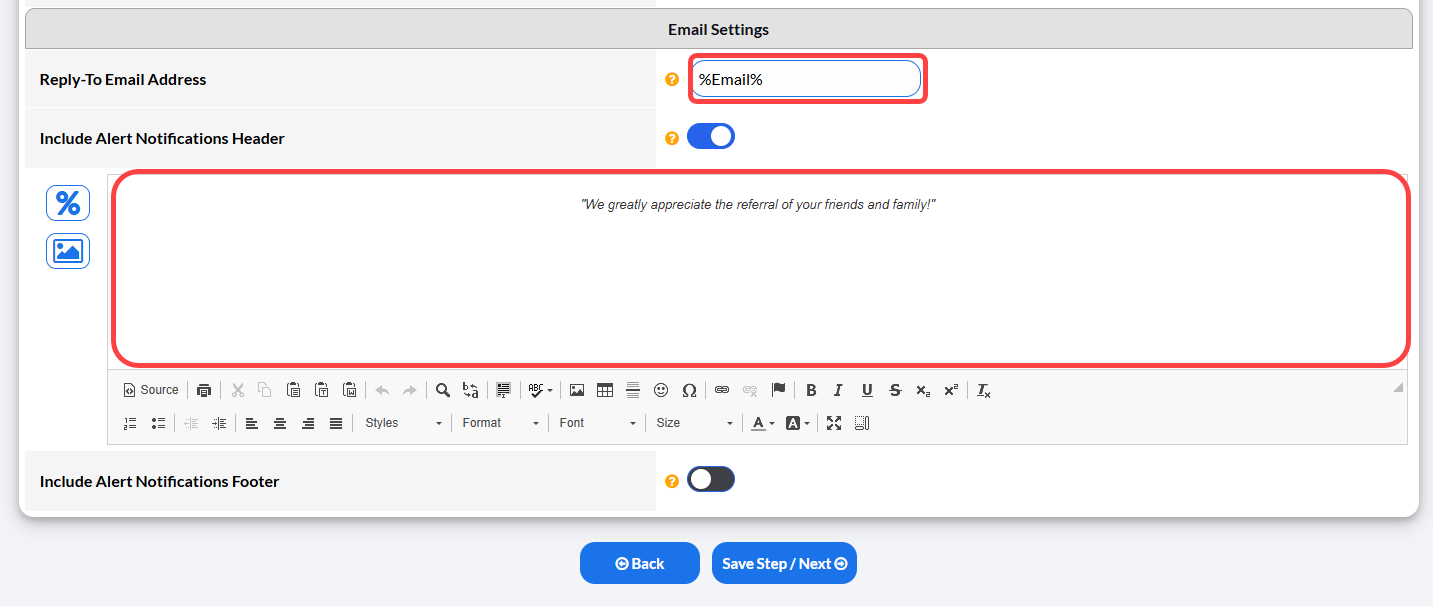
Reply-To-Email Address | Enter the email address you want patients to Reply-To should they click the email's Reply-To button. |
Include Alert Notification Header | Toggle on/off to Turn On the Alert Header. Use the Editor to customize. See an example in the image above. "We greatly appreciate the referral of your friends and family |
Include Alert Notification Footer | Toggle on/off to Turn On the Alert Footer. Use the editor to customize. |
Once finished, select the [Save Step/Next] button.
Step 3: Alert Users
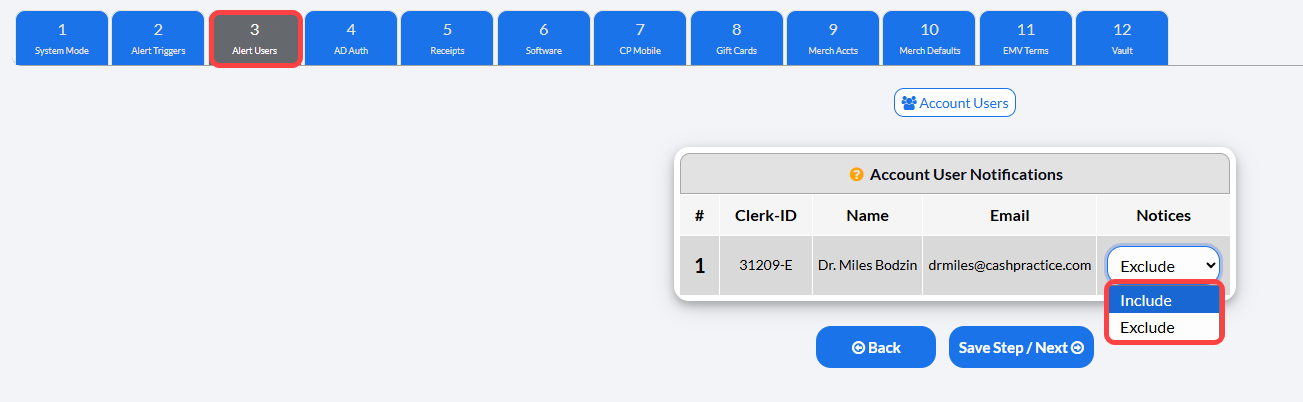
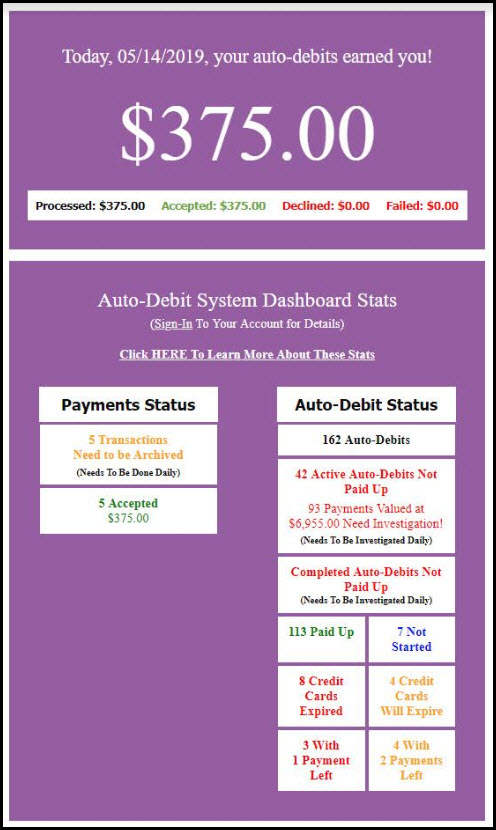
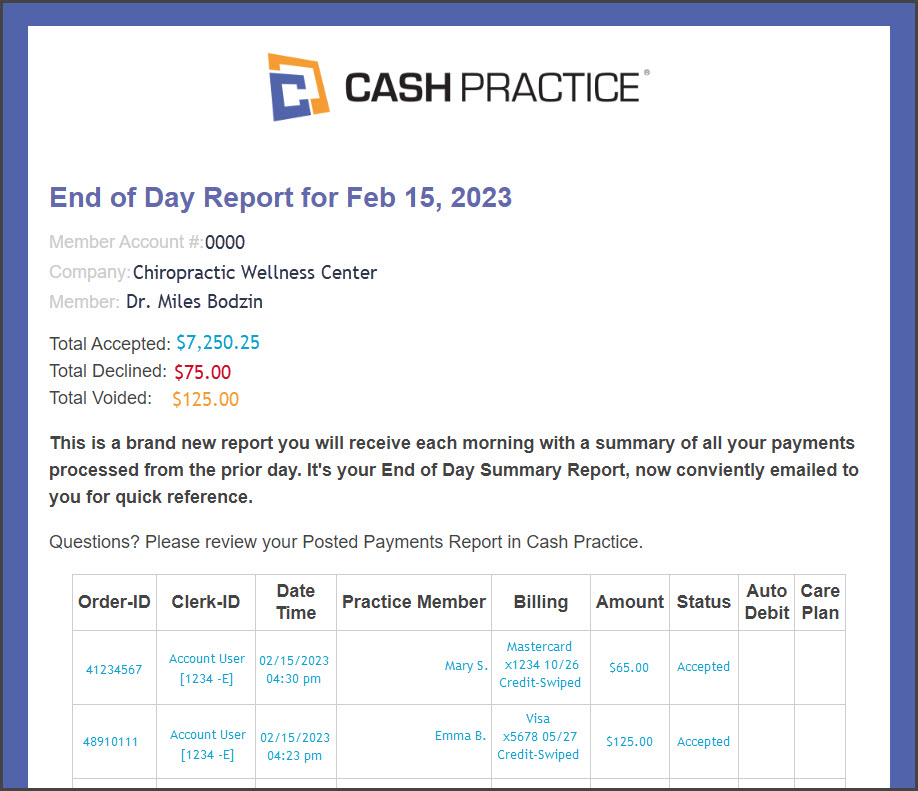
Account administrators get nightly emails summarizing processed auto-debits. Email alerts also include: CP Online Form confirmations and Expired Credit Card reports. See this article for details: Alerts: Detailed Email Notices for Admin and Staff
Please note, this email does not replace reviewing daily Posted Payments Reports for reconciliation.
Account User Notifications:
Include | The account user will receive the emailed Auto-Debit System reports. |
Exclude | The account user will not receive the emailed Auto-Debit System Reports |
Examples of Emailed Auto-Debit Reports:
Once finished, select the [Save Step/Next] button.
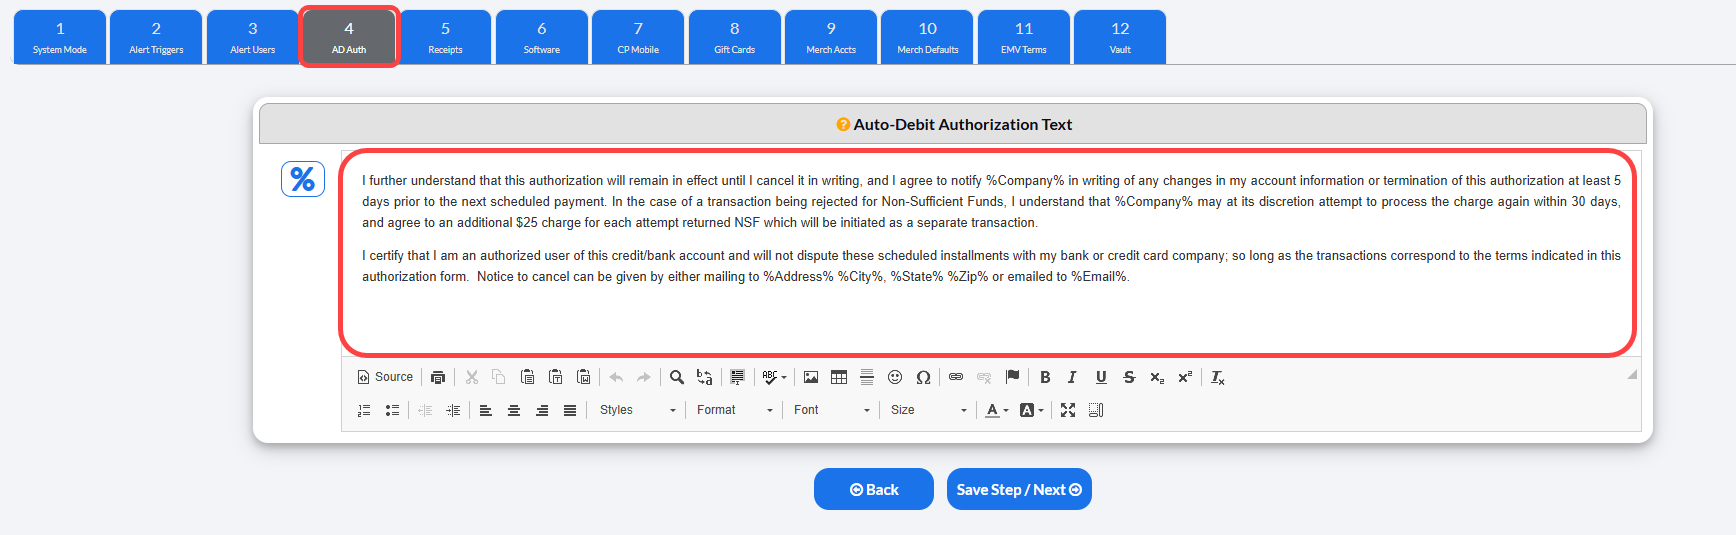
Step 4: AD Auth - Auto-Debit Authorization Text
The content added here will appear on all auto-debit authorization forms. We have added one here for you, but you may edit this to reflect your specific office's views or needs.
Once finished, select the [Save Step/Next] button.
Step 5: Receipts
Our one-time payment tools will produce a sales draft (receipt) to be signed. You can use either your standard computer printer (i.e. laser, inkjet, etc.) or a USB receipt printer. Please note that a USB Receipt Printer is NOT the printer that is attached to your old credit card machine.
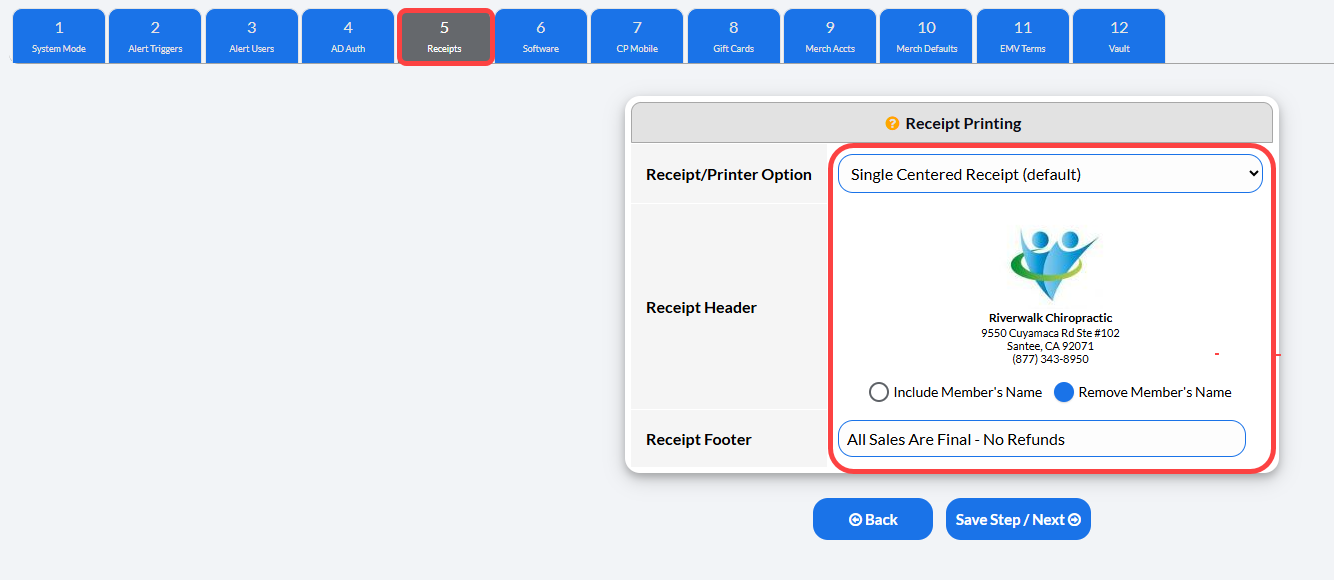
Receipt/Printer Option: | |
Single-Centered Receipt (default) | Prints one receipt on a single sheet of paper. The receipt centered on the page. |
Two Side-by-Side Receipts | Prints two receipts on a single sheet of paper side-by-side |
Single Receipt Impact Printer | Use this setting with impact receipt printers that use carbon-copied paper (white paper with yellow carbon copy). |
Two Receipts One-After-the-Next (thermal printer) | Prints two copies of the receipt, one after the next. Use this setting with thermal receipt printers. |
Receipt Header | Review the receipt's header with your company logo or our defaulted one. Select either Include or Remove the member/Owner's name from the receipts. |
Receipt Footer (optional) | Add text such as "All Sales Are Final - No Refunds" to the bottom of your receipts to honor policies you might have in place. |
Once finished, select the [Save Step/Next] button.
Step 6: Software
Third-Party Software (TPS) has integrated Cash Practice® Systems into their software gives you several advantages over using a business management software package that has not.
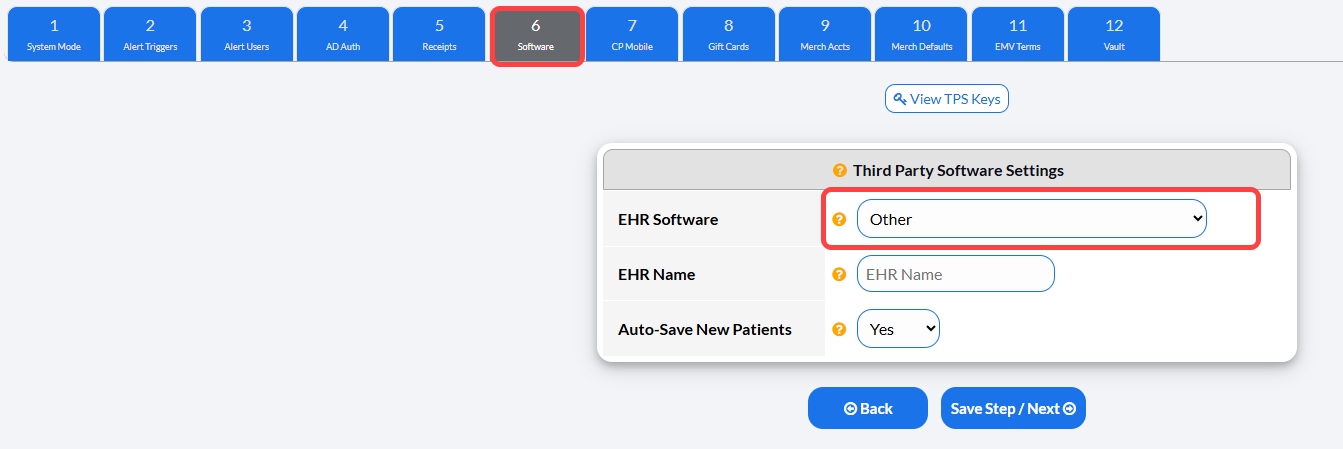
EHR Software: | Select your Practice Management Software from the list: |
Other: If not using any of the above. Please type the name of your EHR in the field below | |
Third-Party Software (TPS) Account ID: | Enter your correct TPS account ID. |
Auto-Save New Patients: | Yes: When you process a payment for a new patient that has no existing patient account in Cash Practice, a new account will be created and saved automatically by simply processing a payment with your TPS integration. |
No: When you process a payment for a new patient who has no existing patient account in Cash Practice, you will be required to create and save a new account before you can begin processing a payment with your TPS integration. |
Once finished, select the [Save Step/Next] button.
Step 7: CP Mobile™
CP Mobile™ allows you to process transactions on your iPhone, iPad, Android, or Tablet/Google Play device. You can allow access to the Administrator Account Only or also allow your Account Users access. If you allow Account User access, you can individually control each of their permissions. You MUST have a Cash Practice Retail Merchant Account to use CP Mobile™.
Click HERE to learn more about CP Mobile.
Note: CP Mobile requires activation. Please allow for a 2-3 business day setup time.
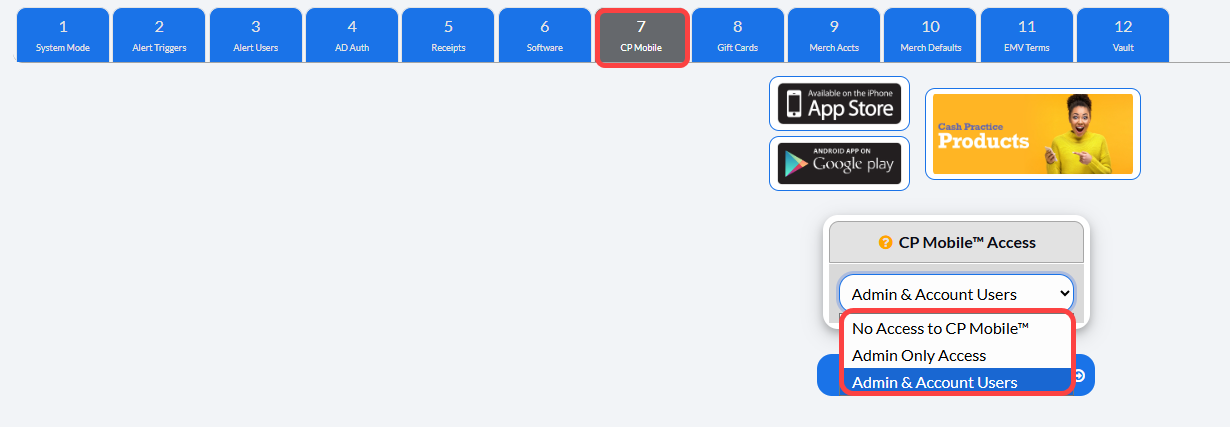
No Access to CP Mobile | No access to processing with the CP Mobile™ App allowed |
Admin Only Access | Only the Administrator (i.e. account owner) will have the ability to process with CP mobile™ |
Admin & Account Users | Both the Administrator and Account Users will be able to process with CP Mobile™. Please note account users have individual permission for CP Mobile, each account user must also have permission to access CP Mobile™. |
Once finished, select the [Save Step/Next] button.
Step 8: Gift Cards
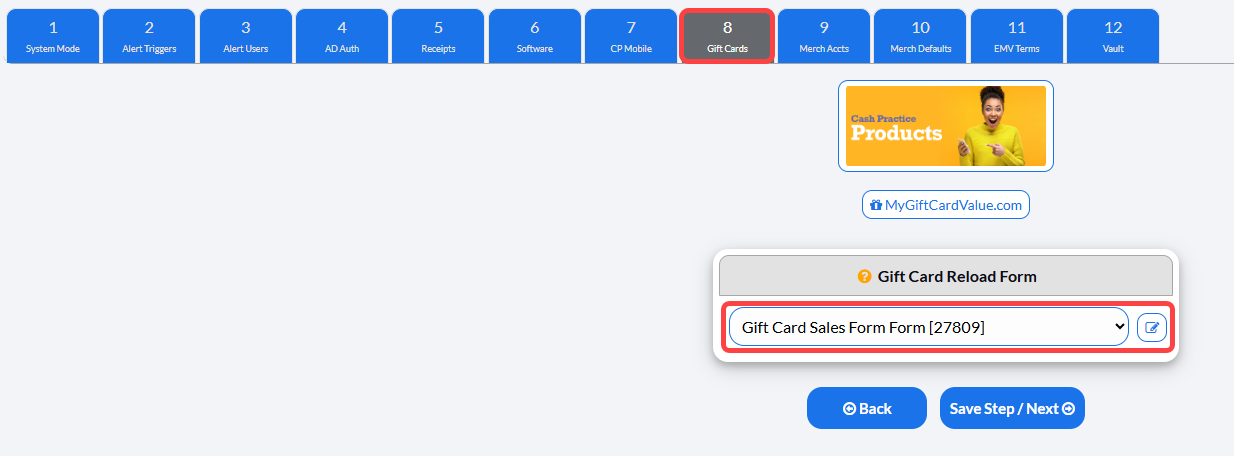
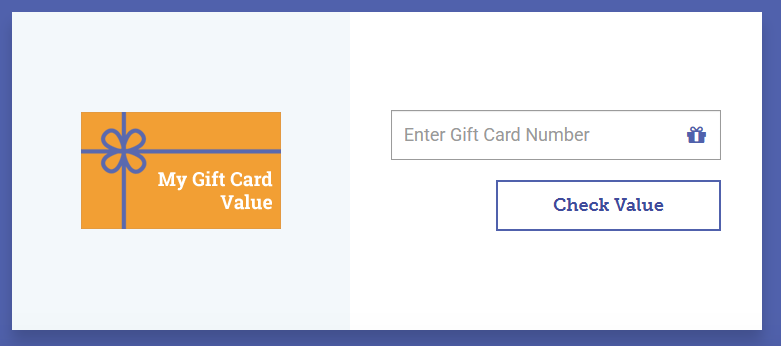
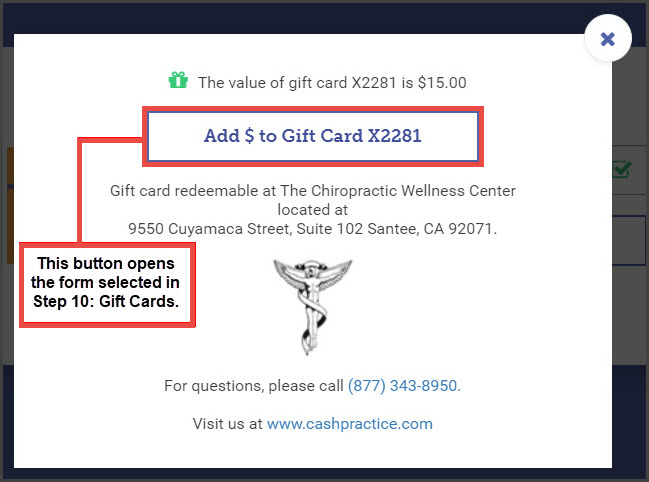
The Gift Cards step is connected directly to offices actively using our Gift Card program. This setting allows the selection of which CP Online Form™ the current Gift Cardholder can select when checking their card balance from www.mygiftcardvalue.com.
Once finished, select the [Save Step/Next] button.
Step 9: Merch Accts
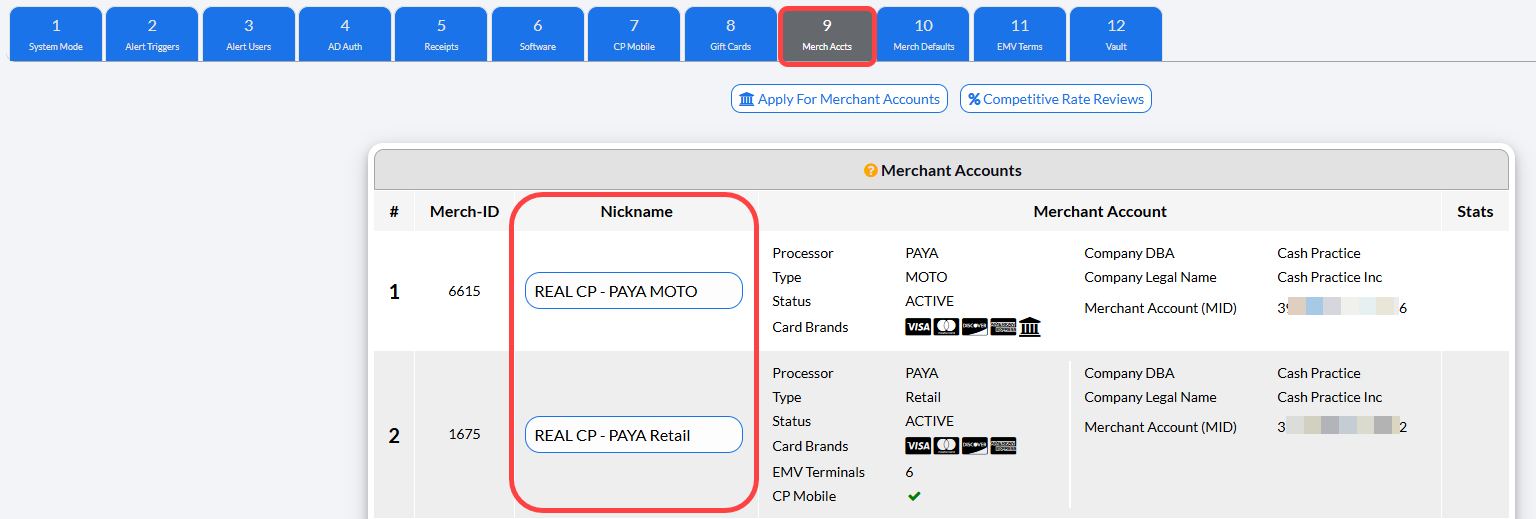
Once your merchant accounts are approved, this section will contain the details such as account ID (MID), volume collected, the last date used, as well as the ability to add a Nickname to the Merchant account.
If using multiple merchant accounts with us, Nickname these by editing the Nickname section on this step.
For more information or if you need to add more merchant accounts, contact our Merchant Services Department by phone at (877) 343-8950 x102) or email MerchantAccounts@CashPractice.com
Once finished, select the [Save Step/Next] button.
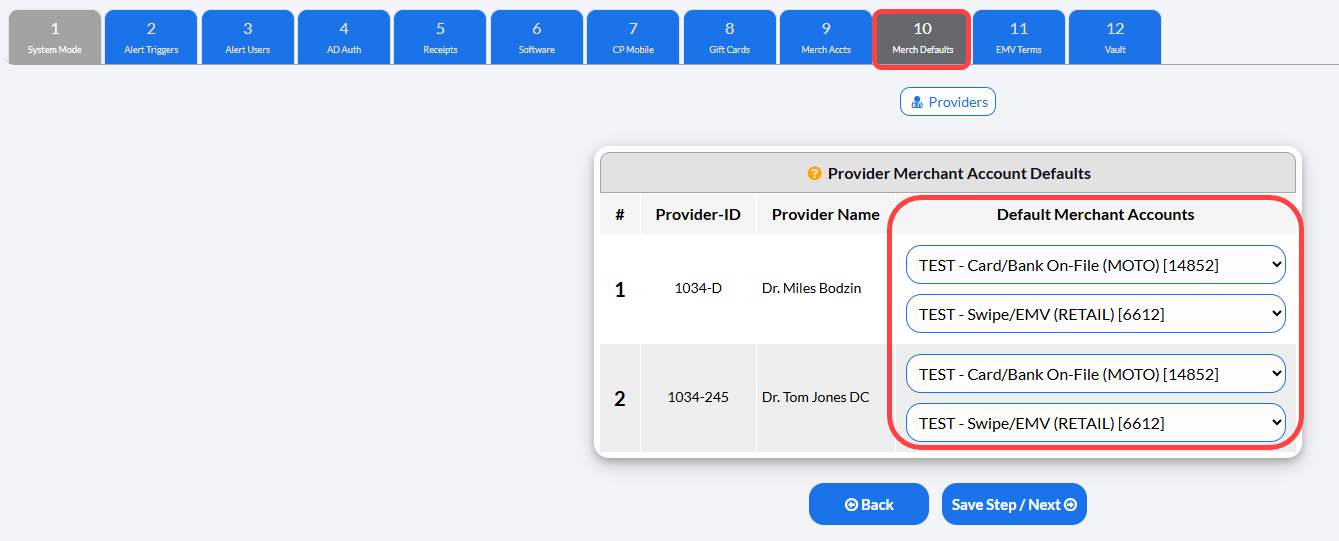
Step 10: Merch(ant Account) Defaults
Select a default merchant account for each provider. Alternative accounts will still be selectable from the merchant account dropdown menu in the Cash Practice payment tools.
For more information about adding an additional provider to your Cash Practice account refer to this article: Associates & Providers: How do I add an Associate/Provider?
Once finished, select the [Save Step/Next] button.
Step 11: EMV Terms (terminals)
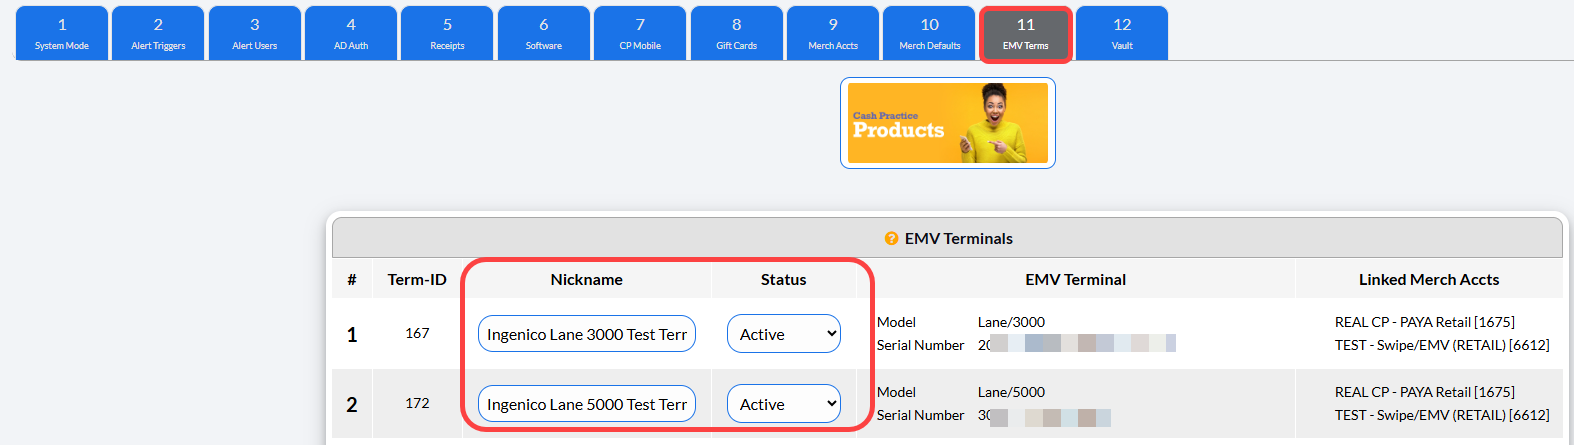
This step shows which EMV terminals are assigned to your account.
You can update the nickname of your EMV terminals to better indentify them in the Cash Practice payment tools.
Status can be set to Active or Inactive.
Once finished, select the [Save Step/Next] button.
Step 12: Vault
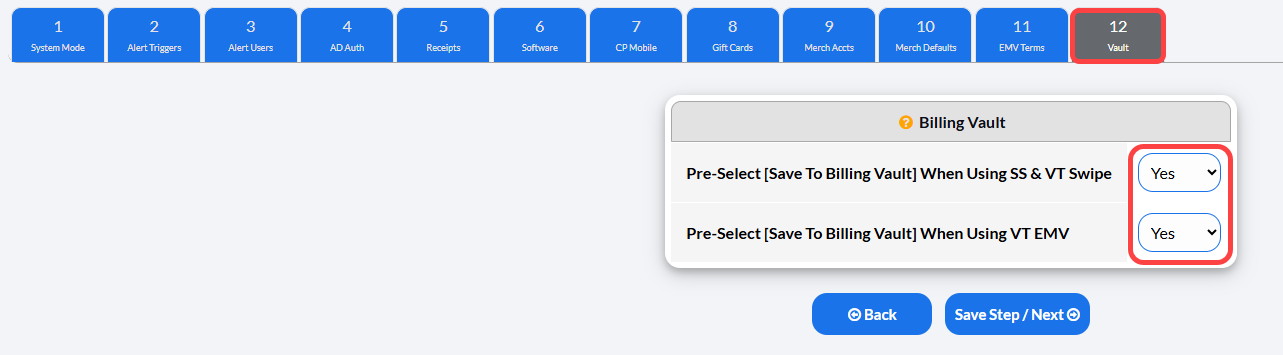
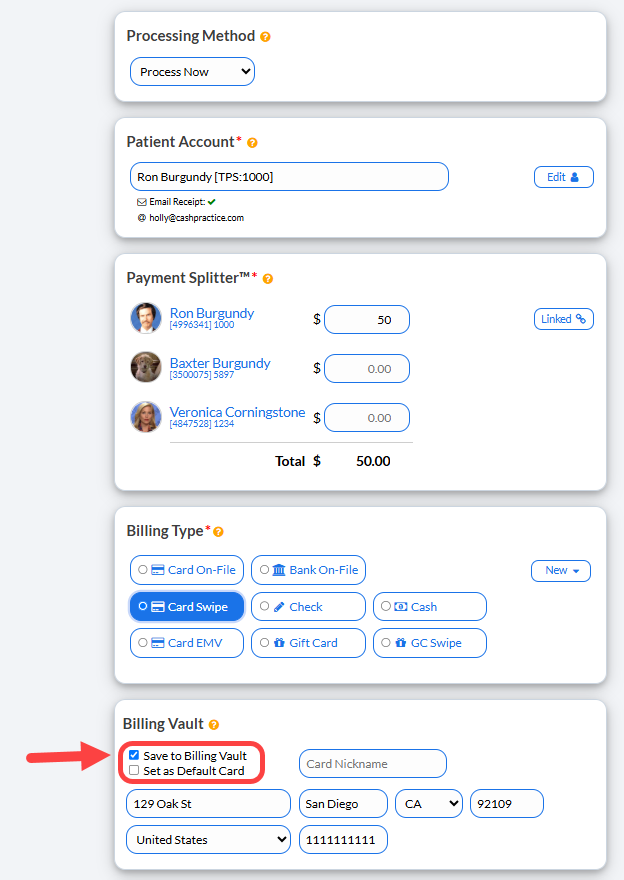
Select Yes or No from the drop-down menu to set whether [Save to Billing Vault] is checked by default when using the Virtual Terminal, Simple Swiper, or EZ Swiper.
Example of this in the Virtual Terminal when swiping:
Once finished, select the [Save Step/Next] button.