Click the Self Help button to use the Cash Practice® Walkthrough when logged into your account.

Getting started:
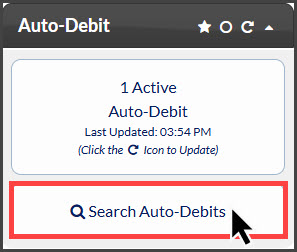
Step 1: From the right side of the [Dashboard] click on the [Search Auto-Debits] button.
Step 2: From the search option, select the correct [Patient Account] → then click on the [Search] button.
Step 3: Click the [Edit Auto-Debit] button.

Step 4: The Auto-Debit Schedule Editor™ will display and allows you to make edits or updates to an Auto-Debit Reminder.
Step 5: Edit Auto-Debit Details - edit any of the following:
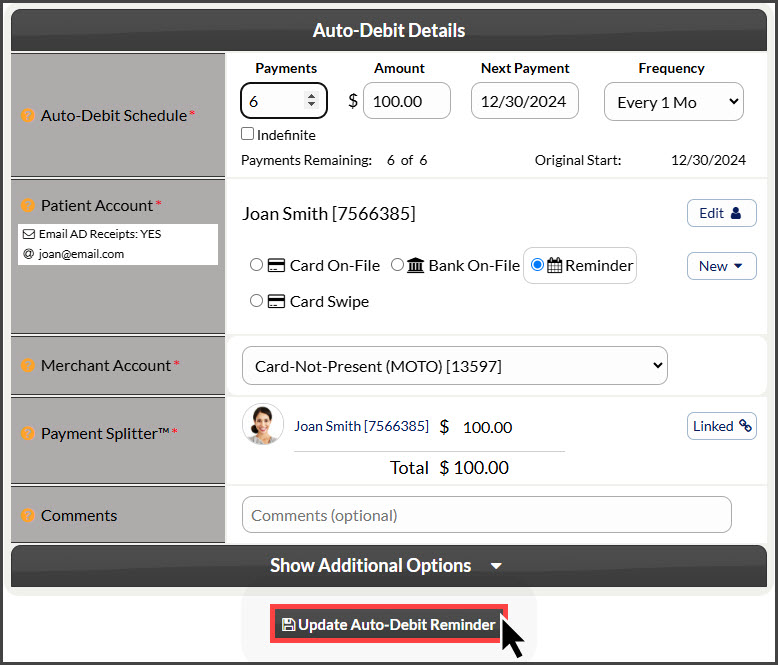
Payments: Enter the number of payments for the scheduled reminder or check the indefinite box to have the reminder go forever.
Amount: Enter the amount the reminder is for.
Next Payment: Click the date to open a calendar that will allow you to edit the next date the reminder will run.
Frequency: Select the payment frequency (Weekly, Bi-Weekly, Monthly, Bi-Monthly, Quarterly, Semi-Annually, or Annually. Amount: Enter the dollar amount. Frequency: Select the payment frequency (Weekly, Bi-Weekly, Monthly, Bi-Monthly, Quarterly, Semi-Annually, or Annually.
Patient Account: Cannot be changed.
The Billing Type is already selected as [Reminder].
Merchant Account: The defaulted merchant account will be displayed, but if using multiple merchant accounts with us, make the correct selection here. For more information, contact our Merchant Services Department by phone at (877) 343-8950 x102) or email MerchantAccounts@CashPractice.com
Comments: (OPTIONAL) Add a comment for your team's eyes only. This will be displayed on the Posted Payments Report when reviewing the transaction details in the future.
Show Additional Options: (OPTIONAL) By clicking the drop-down, you have the capability to assign auto-debit groups, Drip-Education campaigns for frequent contact, Patient Groups to better organize your patient lists, and a comment
Step 6: Click the [Update Auto-Debit Reminder] button.
Step 7: (OPTIONAL) Capture the [e-signature] from the patient.
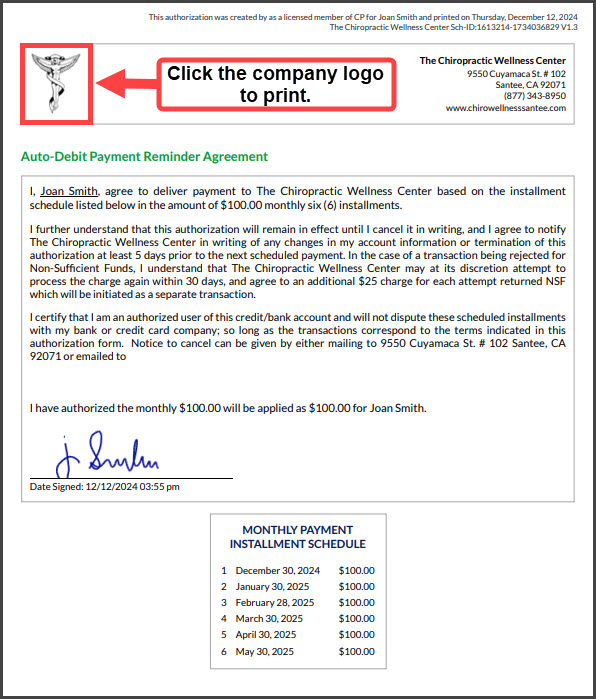
Step 8: Print the updated reminder agreement by clicking on the [Logo].