
Use the Auto-Debit Report Generator™ to do the following:
Review a list of all your scheduled auto-debits
Investigate auto-debits not paid up, due to declines not re-scheduled
Edit scheduled auto-debits
Stop auto-debits
Manage alerts
Below is a detailed explanation for each of The Auto-Debit Report Generator™ columns.
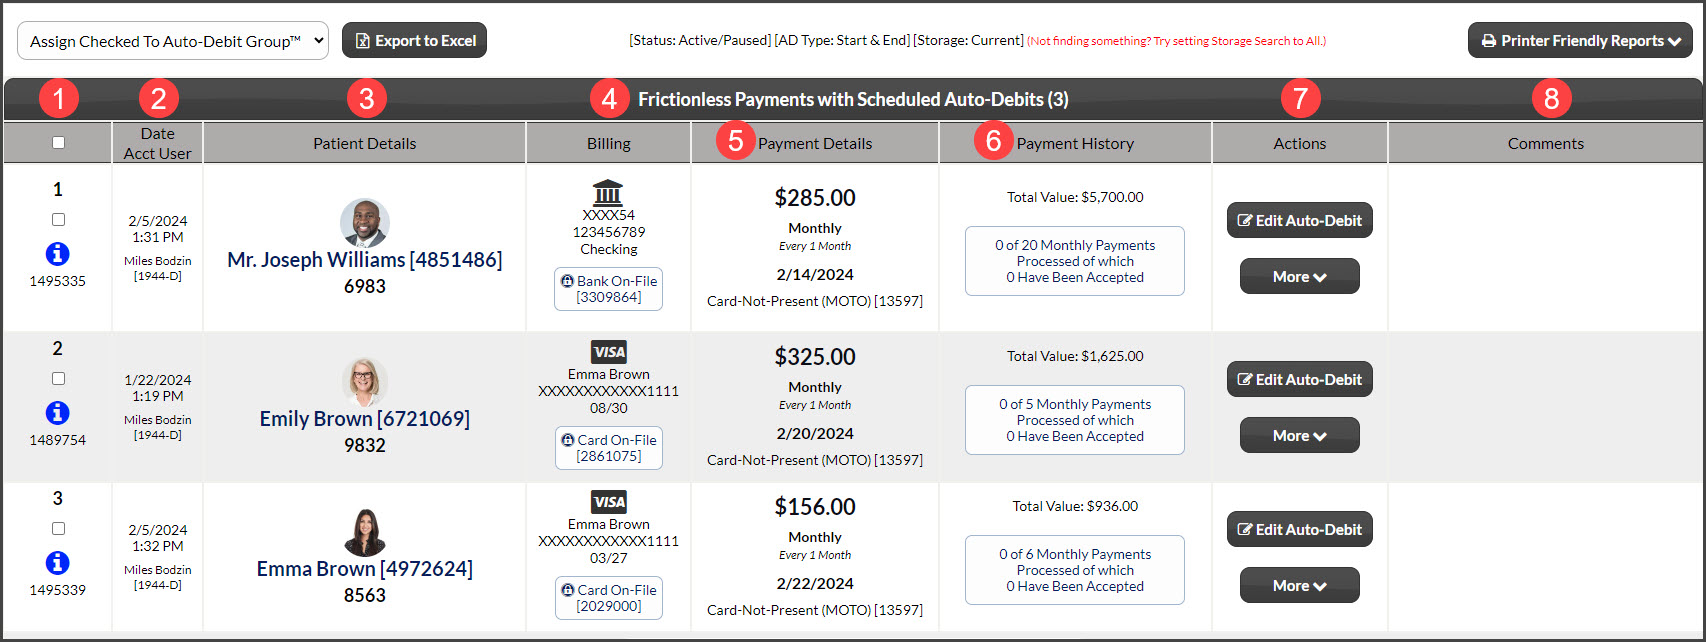
Column 1: Sch-ID, Auto-Debit Status Indicator
Sch-ID: This is the unique ID number for the auto-debit.
Auto-Debit Status Indicator:
[Paid up to date- Green check mark]: Visual indicator to state the auto-debit is paid up to date.
[Not paid up to date- Red exclamation point]: A visual indicator that states the auto-debit is not paid up to date. The auto-debit status indicator will display the not-paid-up status until the alert is removed from the declined or returned transaction.
[Not Started- Blue i]: A visual indicator that states the auto-debit has been scheduled.
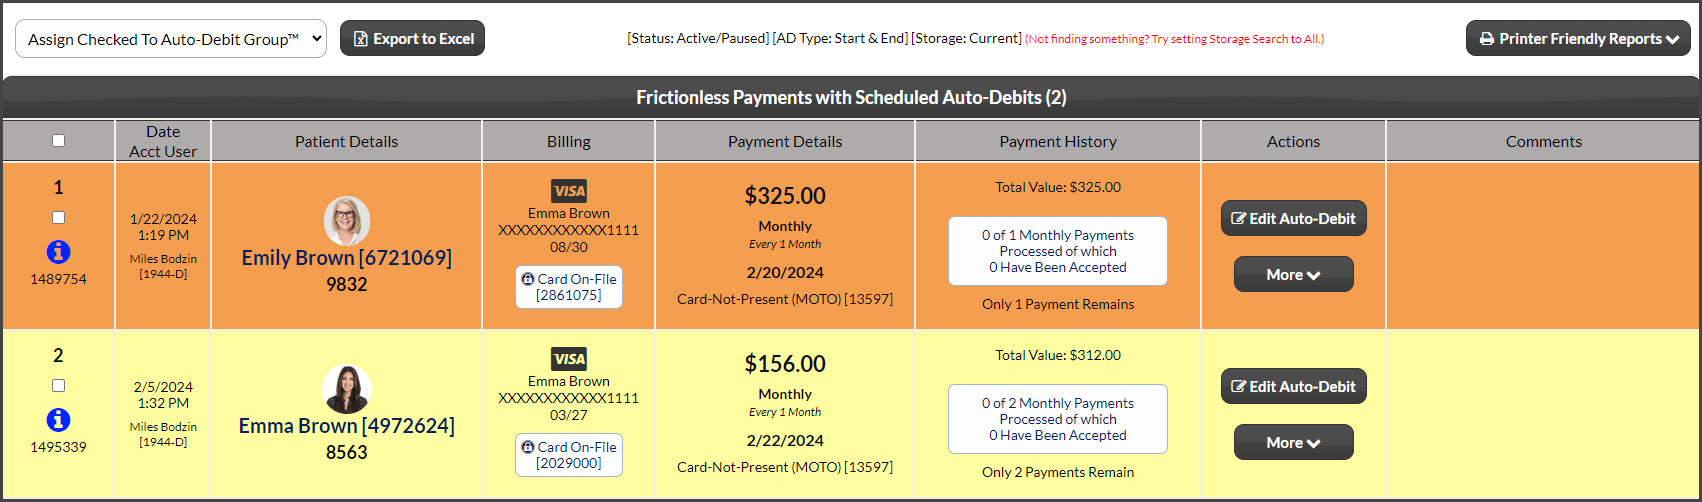
Row Color: Yellow, indicates there are two payments left before their auto-debit is completed. Orange, indicates there is one payment left before their auto-debit is completed.
Column 2: Date & Clerk
Date: This is the date & time the auto-debit was created.
Acct User: The account user's name logged in at the time the auto-debit was created. We highly recommend you create logins for each employee. See instructions HERE.
Column 3: Patient Details: Patient Name, Patient ID, Third-Party Software ID:
Patient Name: This is the name of the Patient Account. By clicking the Patient Name, you will be directed to View Patient Record.
Patient ID: This is a unique identifier generated by Cash Practice Systems to differentiate patient accounts.
Third-Party Software ID: This is a unique identifier generated by the TPS system used in the office (if you do not use a TPS this will not appear).
Column 4: Billing Name, Billing type, Last Four & Expiration date.
Billing Name: This is the name used for billing. Either the name on the credit card or bank account.
Credit: The last four digits of the credit card account number and its expiration date.
If the card will expire the same month as the next scheduled payment, the expiration date will be yellow and display the "about to expire" icon.
If the card expires before the next scheduled payment is due, the expiration date will be red and display the "expired" icon.
Bank EFT: The last four digits of the bank account number are listed with either PC (Personal Checking) or PS (Personal Savings).
Reminder: The Reminder icon will appear here if this is a scheduled auto-debit reminder.
Column 5: Payment Details: Amount, Frequency, Next Payment & Merchant Type:
Amount: This shows the dollar amount of the recurring auto-debit.
Frequency: This shows the frequency of the auto-debit.
Next Payment: This is the date when the next payment is scheduled to be processed.
Merchant Account Type
Internet/MOTO: The auto-debit is being processed with your Internet Merchant Account.
Retail: The auto-debit is being processed with your Retail Merchant Account.
Pending button: The pending button will display if the auto-debit [Next Payment Only Date] has been changed.
Column 6: Payment History
Note: Click the payment history button to view the patient billing history for this Auto-Debit.
Payments Cycles: Indicates the number of payments processed in the auto-debit cycle. If the auto-debit is scheduled to run indefinitely, the total payments will be an X.
Payments Accepted: States how many scheduled auto-debit payments have been accepted in the cycle. If the auto-debit is scheduled to run indefinitely, the total payments will be an X.
Cycles Remaining: States how many more auto-debits are scheduled in the cycle.
Investigate button: Use the "investigate" button to investigate why an auto-debit is short payments (only displays when an auto-debit is not paid up to date).
Short by: If payment has been processed but the transaction declined or was returned, the column will show how many accepted payments the auto-debit is short by and the total value of declined payments.
Column 7: Actions
[Edit Auto-Debit]- This button is used to view or edit an Auto-debit.
[Stop Auto-Debit]- This button is used to stop an Auto-Debit.
[Email Alert] - This tool allows you to email the patient with a button to update their billing information for their scheduled auto-debit.
[Care Plan]- View or print the original copy of the patient’s care plan from this button.
[View Auth Form] - View or print the current payment authorization and payment schedule from this button.
Column 8: Value & Comments:
Value: Represents the value of the entire auto-debit.
Comments: Any comments typed into the comment field or auto-generated when scheduling or editing a scheduled auto-debit are displayed here.