
How the integration works: ClinicMind® opens directly to the Patient Record from the CashPractice.com site. From there, you can access the payment tools and all activity within Cash Practice®.
*Note: Before you can access your CashPractice.com account within ClinicMind®, you must first complete the following:
For the updated version of ClinicMind®:
Step 1: In ClinicMind®, go to the [Schedule].
Step 2: From the schedule, select any patient by clicking on their name.
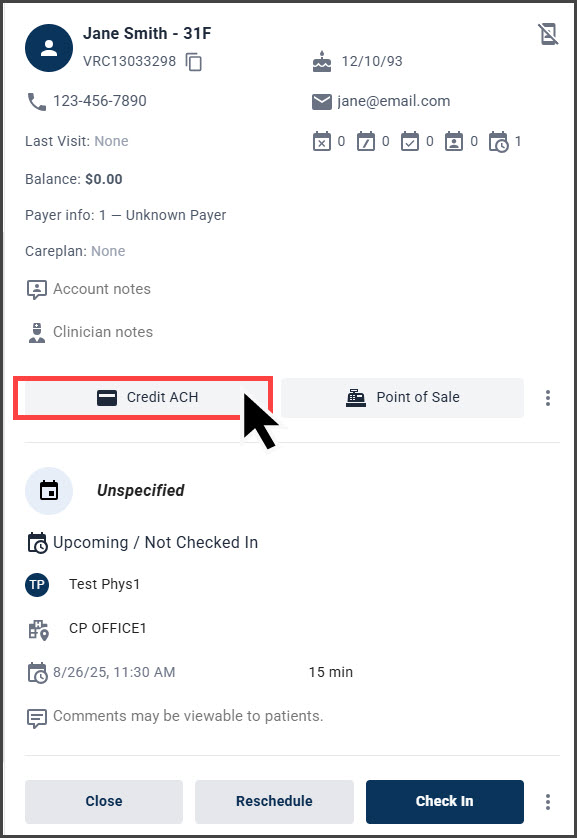
Step 3: Once the patient is selected, click [Credit ACH]. This will open up the patient record in a new window in Cash Practice.
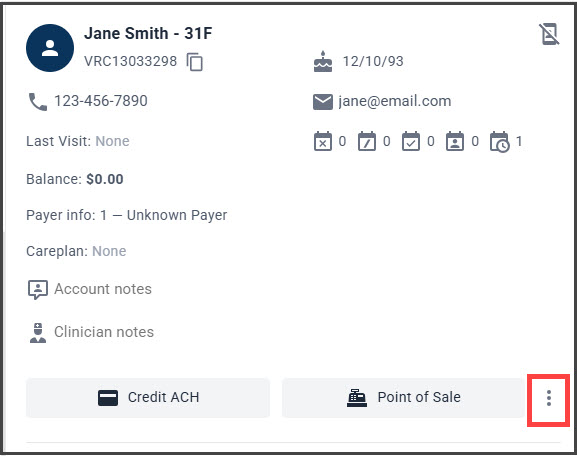
Important: If you do not see the [Credit ACH] option, you may need to click on the three dots to show more options (shown below):
Step 4: From the Patient Record, select the payment tool you will use to process or schedule a payment: Auto-Debit Scheduler™, Virtual Terminal, or EZ Swiper™.
Note: You may also access the other options from the Cash Practice patient record such as the Billing Vault, to review the patient's cards on file or Billing History.

Step 5: Once the payment is accepted, the transaction will be posted to the patient's ledger in ClinicMind® automatically. This integration will post alerts to ClinicMind/Genesis in the Workbench→Tasks (Office View) section and the Quick Stop (Patient View).
For the original version of ClinicMind®/Genesis:
Step 1: In ClinicMind®, go to the [Schedule].
Step 2: From the schedule, select any patient by clicking on their name:
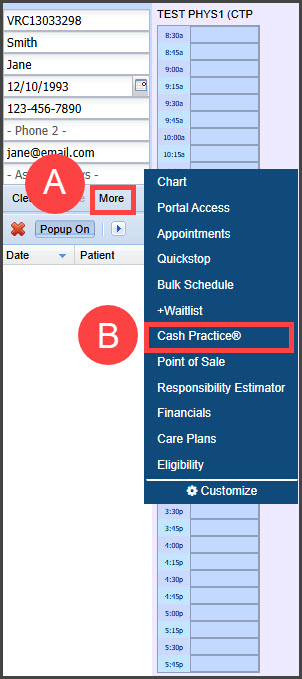
A. Once the patient is selected, click [More].
B. From the menu, select [Cash Practice®]. This will open up the patient record in a new window in Cash Practice.
Step 3: In the Patient Record, select the payment tool you will use to process or schedule a payment: Auto-Debit Scheduler™, Virtual Terminal, or EZ Swiper™.
Note: You may also access the other options from the Cash Practice patient record such as the Billing Vault, to review the patient's cards on file or Billing History.

Step 4: Once the payment is accepted, the transaction will be posted to the patient's ledger in ClinicMind® automatically. This integration will post alerts to ClinicMind/Genesis in the Workbench→Tasks (Office View) section and the Quick Stop (Patient View).